Getting Started with the Nice PayPal Button Plugin
IMPORTANT: Starting with version 2.73, the Nice PayPal Button download file (unzip1st_nicepaypalbtn.zip) must be unzipped before install. The version 2.73+ zip file contains two plugins, j1.5-nicepaypalbtn.zip for Joomla 1.5 and j1.6-nicepaypalbtn.zip for Joomla 1.6.
1. If you don't already have one, sign up for a business PayPal account.
2. Install the plugin using Joomla's Extension Manager.
3. Go to Extensions>>Plugin Manager and click into the plugin “System – Nice PayPal Button.”
4. Enable the plugin.

5. Add your PayPal account email to the parameters on the right.

6. Optionally add your sandbox sellers account email if you plan to do testing.
7. Optionally set the test mode to on or off - the default is off.
8. Optionally enter your PayPal supported 3 letter currency code – default is USD.
9. Optionally, Enter your 2 digit country code to set the language used on the PayPal payment page. PayPal uses a two-character country code (ISO 3166). Some examples are United States: US, Great Britain: GB, France: FR, Spain: ES, Poland: PL, German: DE. If you don't know your country code, or you can Google PayPal Country Codes.
10. Optionally, set your button language code. PayPal uses a 5 character code to designate language it's buttons. For example, United States English is designated with en_US. Enter the 5 character code for the desired button language. Other code examples are Great Britain English: en_GB, French: fr_FR, Spanish: es_ES, Polish: pl_PL, German: de_DE. If you don't know the code for your desired language, log into PayPal use the button creator and search the resulting HTML code for this https://www.paypal.com/en_US/i/btn/btn_buynow_LG.gif. Notice the en_US in the URL, it's the language code for the button.
11. Save your changes.
12.
Important - (ignore this step if you are using Nice PayPal Button version 2.0 or greater) Email Cloaking is a default feature of Joomla. Unless you have specifically disabled it, it is enabled on your site. If this is the case then, in the Plugin Manager, you will need to change the order of the Nice PayPal Button plugin so that it appears below the Email Cloaking plugin in the plugin list. Otherwise, the PayPal buttons that the Nice PayPal plugin creates won't work properly.
![]()
13. Add the tag code {nicepaypal:button type|price|item name} to your article (or custom module, etc.) where you want the PayPal button to show up.
Place the Nice PayPal Button tag in your content.

A PayPal button replaces the Nice PayPal button tag.

Basic Tag Usage
Usage is simple. Create a new article and add your desired content to it. Wherever you want a PayPal button to appear include this tag {nicepaypal:button type|price|item name}.
Tag Syntax {nicepaypal:button type|amount|item name}
Examples
For a PayPal Buy Now button use this syntax {nicepaypal:buy|5.00|Fluffy Bunny}
For a PayPal Pay Now button use this syntax {nicepaypal:pay|5.00|Fluffy Bunny}
For a PayPal Donation button use this syntax {nicepaypal:donate|0.00|Feed the Children}
Notice that the purchase amount is set to 0, if you set it to 0.00 or leave it blank, e.g. {nicepaypal:donate||Feed the Children}, then the payer will have the option to specify their own donation amount during the PayPal checkout process.
For a PayPal Cart button use this syntax {nicepaypal:cart|5.00|Fluffy Bunny}
Items will be added to the PayPal Cart system as the payer continues to shop, until they checkout. This creates a convenient method for the payer to purchase multiple items from your site and a great way for you to maximize sales.
Extended Tag Usage
This plugin has a number of extended options that make it very flexible and convenient for most merchant's needs.
Extended Tag Syntax {nicepaypal:button type|amount|item name|item number|shipping|shipping2|tax|item quantity|weight|option1|option2}
Extended Usage Example
{nicepaypal:cart|9.95|Delicious Coffee Beans – 1lbs.|sku-1234|4.50|1.25|.73}
When using the additional options you may choose to leave any additional item out by simply omitting the information between the pipes “|” that you wish to leave out, e.g. “item number|||tax”. The example below illustrates an item to be sold utilizing PayPal's cart system with no item number or alternative shipping amount for additional quantities of the same item.
Extended Usage Example II
{nicepaypal:cart|9.95|Delicious Coffee Beans – 1lbs.||4.50||.73}
The tag above defines a button that is set to buy one pound of coffee for $9.95 with a shipping charge of $4.50 and a tax of $0.73. Note the blank parameters, the missing information between the pipes “||” omits the option from the button.
Tag Parameter Definitions
Button type
{nicepaypal:button type|amount|item name|item number|shipping|shipping2|tax|item quantity|weight|option1|option2}
Select between 6 different button operational types; the PayPal Buy Now button, the PayPal Pay Now button, the PayPal Donation button, the PayPal Cart & View buttons, the PayPal Cart button and the PayPal View Cart button. If omitted the button sill default to a “Buy Now” button.
Three of the button types are variations for the cart type, "cart". "cart_noview" and "cart_view". The button type "cart" will render a Add to Cart & View Cart buttons together. The "cart_noview" type will only render the Add to Cat button. The "cart_view" will only render the View Cart button.
Valid entries are “buy”, "pay", “donate”, “cart”, "cart_noview", or "cart_view"
Examples
Buy now button: {nicepaypal:buy|9.95|Delicious Coffee Beans}
Pay now button: {nicepaypal:pay|9.95|Delicious Coffee Beans}
Donation button: {nicepaypal:donate|9.95|Delicious Coffee Beans}
Both cart & view buttons: {nicepaypal:cart|9.95|Delicious Coffee Beans}
Cart only button: {nicepaypal:cart_noview|9.95|Delicious Coffee Beans}
View cart only button: {nicepaypal:cart_view|9.95|Delicious Coffee Beans}
Custom Button Graphics
{nicepaypal:button type;custom graphic URL|amount|item name....
You may desire to use your own custom button graphic in place of the standard PayPal button graphic. In which case, you only need to add the URL of your custom graphic to the tag.
Example
Donate with stabdard PayPal button art - {nicepaypal:donate|10.00|Feed the Children}
Donate with custom button art - {nicepaypal:donate;http://domain.com/images/custombutton.jpg|10.00|Feed the Children}
The second example will result in something like this:

*Please note that custom graphics can be used on any button type except the "cart" type. This is because "cart" renders a combination of two buttons, the Add to Cart and View Cart buttons. Also, here is a partial list of available PayPal provided button graphics.
Individual Button Language
{nicepaypal:button type;custom graphic URL;button language code|amount|item name....
Example
{nicepaypal:cart;;fr_FR|15.00|T-Shirt}
Individual Button Country Code
{nicepaypal:button type;custom graphic URL;button language code;PayPal country code|amount|item name....
Example
{nicepaypal:cart_noview;;;ES|15.00|T-Shirt}
Example of individual button language and individual country code together:
{nicepaypal:cart_noview;;es_ES;ES|15.00|T-Shirt}
Individual Button Currency Code
*IMPORTANT: PayPal does not allow mixed currency codes in the PayPal hosted Shopping Cart. You need to restrict the usage of this setting to "Buy Now" and "Pay Now" button types only.
{nicepaypal:button type;custom graphic URL;button language code;PayPal country code;currency code|amount|item name....
Example
{nicepaypal:buy;;;;MXN;|15.00|T-Shirt}
Example of individual button language, individual country code and currency code together:
{nicepaypal:buy;;es_ES;ES;MXN;SXR637D9Z4Q3G|15.00|T-Shirt}
Different Seller Account per Button
As of the Nice PayPal Button plugin version 2.86, you can specify a different PayPal Seller for each button by specifying the seller's Merchant Account ID in the Merchant Account ID parameter. You can find your Merchant Account ID in your PayPal account profile under My Business Info.
{nicepaypal:button type;custom graphic URL;button language code;PayPal country code;currency code;Merchant Account ID|amount|item name....
Example
{nicepaypal:buy;;;;;SXR637D9Z4Q3G|15.00|T-Shirt}
Example of individual button language, individual country code, currency code and merchant account id together:
{nicepaypal:buy;;es_ES;ES;MXN;SXR637D9Z4Q3G|15.00|T-Shirt}
Amount
{nicepaypal:button type|amount|item name|item number|shipping|shipping2|tax|item quantity|weight|option1|option2}
The price or amount of the product, service, or contribution, not including shipping & handling, or tax. If omitted from Buy Now or Donate buttons, payers enter their own amount during checkout on the PayPal payment page.
*Do not enter a currency symbol, just the numerical amount.
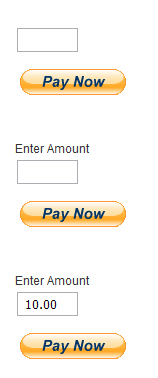
To display an amount text input field, which will allow the buyer to enter their own amount, use the following syntax.
Syntax
{nicepaypal:button type|type;label;default value;field size|item name|item number|shipping|shipping2|tax|quantity|weight|option1|option2}
Examples
{nicepaypal:pay|field|Delicious Coffee Beans 1lbs.|sku-1234|4.50|2.50|.73|1}
{nicepaypal:pay|field;Enter Amount|Delicious Coffee Beans 1lbs.|sku-1234|4.50|2.50|.73|1}
{nicepaypal:pay|field;Enter Amount;10.00|Delicious Coffee Beans 1lbs.|sku-1234|4.50|2.50|.73|1}
Results
Item name
{nicepaypal:button type|amount|item name|item number|shipping|shipping2|tax|item quantity|weight|option1|option2}
Description of item. If omitted, payers enter their own name at the time of payment.
Item number
{nicepaypal:button type|amount|item name|item number|shipping|shipping2|tax|item quantity|weight|option1|option2}
Pass-through variable for you to track product or service purchased or the contribution made. The value you specify passed back to you upon payment completion.
Shipping
{nicepaypal:button type|amount|item name|item number|shipping|shipping2|tax|item quantity|weight|option1|option2}
The cost of shipping this item. If you specify shipping and shipping2 is not defined, this flat amount is charged regardless of the quantity of items purchased.
This use of the shipping variable is valid only for Buy Now and Add to Cart buttons.
Default – If profile-based shipping rates are configured, buyers are charged an amount according to the shipping methods they choose.
Shipping2
{nicepaypal:button type|amount|item name|item number|shipping|shipping2|tax|item quantity|weight|option1|option2}
The cost of shipping each additional unit of this item. If omitted and profile-based shipping rates are configured, buyers are charged an amount according to the shipping methods they choose.
Valid only for Buy Now and Add to Cart buttons.
Tax
{nicepaypal:button type|amount|item name|item number|shipping|shipping2|tax|item quantity|weight|option1|option2}
Transaction-based tax override variable. Set this to a flat tax or rate/percentage tax amount to apply to the transaction regardless of the buyer’s location. This value overrides any tax settings set in your account profile. Valid only for Buy Now, Pay Now and Add to Cart buttons. Default – Profile tax settings, if any, apply.
To use your PayPal account tax settings simply leave the tax field blank by using a double pipe "||".
Syntax
...|tax_flat;tax_rate|...
Example for a $0.50 flat tax
{nicepaypal:cart|$9.95|Fitness DVD|sku 1234|2.50||.50||1}
Example for 10% tax rate
{nicepaypal:cart|$9.95|Fitness DVD|sku 1234|2.50||;10||1}
Example for both a $0.50 flat tax and a 10% tax rate
{nicepaypal:cart|$9.95|Fitness DVD|sku 1234|2.50||.50;10||1}
Item Quantity
{nicepaypal:button type|amount|item name|item number|shipping|shipping2|tax|item quantity|weight|option1|option2}
The number of items or item quantity included in the purchase. For example, if you wanted to sell 10 golf balls at once, you would set the item quantity to 10.
{nicepaypal:buy|15.00|Joomla T-Shirt|sku-1234|2.50||1.25|10}
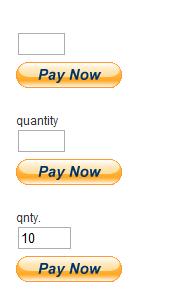
Quantity Text Input Field
To display a quantity text input field, which will allow the buyer to enter their own quantity, use the following syntax.
Syntax
{nicepaypal:button type|amount|item name|item number|shipping|shipping2|tax|type;label;default value;field size|weight|option1|option2}
Examples
{nicepaypal:pay|9.95|Delicious Coffee Beans 1lbs.|sku-1234|4.50|2.50|.73|field|1}
{nicepaypal:pay|9.95|Delicious Coffee Beans 1lbs.|sku-1234|4.50|2.50|.73|field;quantity|1}
{nicepaypal:pay|9.95|Delicious Coffee Beans 1lbs.|sku-1234|4.50|2.50|.73|field;qnty.;10;3|1}
Resulting buttons
Weight
{nicepaypal:button type|amount|item name|item number|shipping|shipping2|tax|item quantity|weight|option1|option2}
Weight of items. If PayPal account based shipping rates are configured with a basis of weight, the sum of weight values is used to calculate the shipping charges for the transaction. To enable PayPal account based shipping leave the shipping and shipping2 fields blank by using a double pipe "||". After which you can optionally specify a item weight by entering a numerical (float) weight value, e.g. 1.5.
Example
{nicepaypal:cart|29.95|Fitness DVD|sku 54321|||2.17|1|1.5}
You may specify pounds or kilograms by adding a suffix of lbs or kgs to your weight value. If no suffix is provided the units of weight will default to pounds.
Example
{nicepaypal:cart|29.95|Fitness DVD|sku 54321|||2.17|1|1.5kgs}
Option1
{nicepaypal:button type|amount|item name|item number|shipping|shipping2|tax|item quantity|weight|option1|option2}
Option 1 has 2 possible configurations, a text entry options field or a drop-down options box.
To specify a text entry options field you need to utilize a sub-syntax as a parameter, |option type;option label;option message;max length of text|
Example
{nicepaypal:cart|17.95|Joomla T-Shirt||||1.30|1|.3|field;size;Enter your size;60}
To specify a drop-down options box you need to utilize a sub-syntax as a parameter, |option type;option label;option message;option value;option value;option value|
Example
{nicepaypal:cart|17.95|Joomla T-Shirt||||1.30|1|.3|drop;color;Select t-shirt color;Red;Blue;White;Black}
*Note, you may enter as many "option values" as you need. For example, if you need to offer 3 different shirt colors, you could have a syntaxt that looks like the following.
|drop;color;Select t-shirt color;Red;Blue;White}
Alternatively, if you wanted to offer six shirt colors you might have a syntax like the following.
|drop;color;Select t-shirt color;Red;Blue;White;Black;Green;Yellow}
Option2
{nicepaypal:button type|amount|item name|item number|shipping|shipping2|tax|item quantity|weight|option1|option2}
Option2 supports the same two option types as the Option1 paramter, using the same syntax. This makes it possible to have two drop-down boxes, two text entry fields, or a combination of the two.
An important difference is that Option2 supports a third option type, a price specifying drop-down box. For example if you offered several shirt sizes and wanted to charge a different price for each size you would use Option2 with a price specifying drop-down box.
To specify a price specifying drop-down box you need to utilize a sub-syntax as a parameter, |option type;option label;option message;option value:price;option value:price;option value:price|
Example
{nicepaypal:cart||Joomla T-Shirt||||1.30|1|.3||dropprice;size;Select your t-shirt size;Sm:13.00;Md:15.00;Lg:17.00;Xl:20.00}
It is important to note that, when using this third option, you should leave the item "amount" parameter blank by using a double pipe "||", {nicepaypal:cart||Joomla T-Shirt
*Note, you may enter as many "option value:price" pairs as you need. For example, if you need to offer 3 different shirt sizes at different prices, you could have a syntaxt that looks like the following.
|dropprice;size;Select your t-shirt size;Sm:13.00;Md:15.00;Lg:17.00}
Alternatively, if you wanted to offer six shirt sizes at different prices, you might have a syntax like the following.
|dropprice;size;Select your t-shirt size;Y:10.00;Sm:13.00;Md:15.00;Lg:17.00;Xl:20.00;Xxl:23.00}
dropprice vs. dropprice2
dropprice and dropprice2 fundamentally function the same in that they use the same tag syntax and both produce a drop-down menu that will alter the product price. The difference between the dropprice and the dropprice2 option is fairly straight forward. dropprice pre-formats the text that is displayed in the drop down menu list. This is the formating that is followed by dropprice:
Option Name+Price+Currency Code
dropprice2 is more flexible in that it does not pre-format the option text in the drop-down menu. This added flexibility allows for text display options that will support VAT and GST tax style listings with pricing options. The following tag example shows how this can be accomplished using the tax rate (percentage) option.
{nicepaypal:buy||T-Shirt||||;10.00||||dropprice2;size;Select Size;SM - price including GST - 11.00 AUD:10.00;MD - price including GST - 16.50 AUD:15.00;LG - price including GST - 22.00 AUD:20.00}
The output of the above tag will show a drop down selection with options like "SM - price including GST - 11.00 AUD" to the buyer. However at checkout the pricing will be split into the proper sale price and sales tax for the item.
Option1 & Option2 Together
A combined usage of Option1 and Option2 for the same button might look something like the following example.
{nicepaypal:cart||Joomla T-Shirt||||1.30|1|.3|drop;color;Select t-shirt color;Red;Blue;White;Black|dropprice;size;Select your t-shirt size;Sm:13.00;Md:15.00;Lg:17.00;Xl:20.00}
The above tag would result in creating the button below.
Another option might be something like the following.
{nicepaypal:cart||Joomla T-Shirt||||1.30|1|.3|field;size;Enter your size;60|dropprice;size;Select your t-shirt size;Sm:13.00;Md:15.00;Lg:17.00;Xl:20.00}
The above tag would result in creating the button below.
This example of course is a bit silly, since we are asking the buyer to enter their size twice. But, you get the technical concept.
Additional Product Options
You may specify additional options in the option2 field by seperating them with a double semi-colon ";;". Simply define the new options with the same syntax used for option1 and option2. You may specify a total of 9 options, this is PayPal's limit. The nine options include option1.
{nicepaypal:button type|amount|item name|item number|shipping|shipping2|tax|item quantity|weight|option1|option2;;option3;;option4}
Example
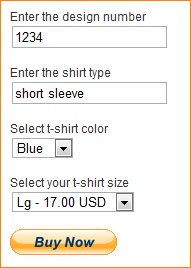
{nicepaypal:buy||Joomla T-Shirt||||1.30||.3|field;design-num;Enter the design number;60|field;shirt-type;Enter the shirt type;60;;drop;color;Select t-shirt color;Red;Blue;White;Black;;dropprice;size;Select your t-shirt size;Sm:13.00;Md:15.00;Lg:17.00;Xl:20.00}
The above tag would result in a button that looks something like the following.
Return URL
{nicepaypal:button type|amount|item name|item number|shipping|shipping2|tax|item quantity|weight|option1|option2|return URL}
You can specify a unique return URL per button, by entering the full URL of your desired return page in the return URL field.
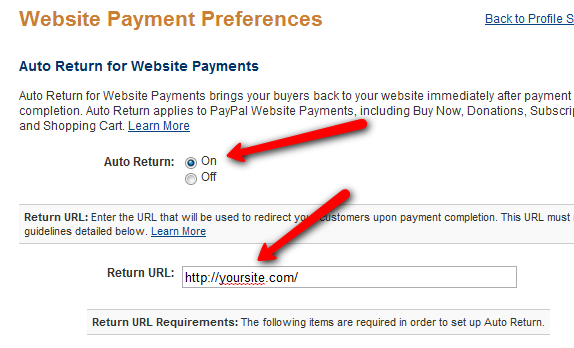
For the return URL to work correctly you will need to make a quick change to your PayPal account profile settings. Here is what what to do:
1. Log-in to your PayPal account.
2. go to My Account>>Profile>>Selling Preferences>>Website Payment Preferences>>Auto Return for Website Payments.
3. Select the "On' radio button and enter the the default URL you want the buyer to be returned to, then click submit. The return URL specified in your button tag will override the default URL in set in your PayPal account.
Cancel URL
{nicepaypal:button type|amount|item name|item number|shipping|shipping2|tax|item quantity|weight|option1|option2|return URL|cancel URL}
You can specify a unique cancel URL per button, by entering the full URL of your desired cancel page in the cancel URL field.
Note, please review the documentation for Return URL (above) to ensure your PayPal account profile is set up correctly.
PayPal Hosted Buttons
Starting with version 2.64 basic support for PayPal hosted buttons is provided by the Nice PayPal Button. To use this feature follow the steps below.
1. Log in to your PayPal account.
2. Go to “Merchant Services”
3. Under Create Button, select the button type ("Add to Cart”, “Buy Now”, etc.).
4. Fill in the button form. Please note that drop down menu options are not currently supported by the Nice PayPal Button plugin for hosted buttons.
5. Click “Step 2”, make sure that the “Save button at PayPal” check box is selected.
6. Click “Create Button”
7. Copy and paste the button code to Notepad or some other text editor.
8. Find the line of code that says “hosted_button_id” and copy the id number that is quoted in the value parameter.
9. Log in to your Joomla account and create a new article.
10. Type the following tag into the article editor. Replace the example number with the parameter number retrieved in step 8.
{nicepaypal:hosted-cart_noview|JK8U665S}
11.Save your article and your done.
For other hosted button types use the following syntaxes.
{nicepaypal:hosted-donate|....
{nicepaypal:hosted-cart_noview|....
{nicepaypal:hosted-buy|....
{nicepaypal:hosted-pay|....
Hosted View Cart Buttons
To set up a hosted view cart button do the following.
1. After creating a hosted cart button and while you are still on the PayPal copy code page, scroll down a bit and find and click the “Create View Cart Button” link.
2. Except the default PayPal Button setting.
3. Click “Create Button”
4. Copy and paste the button code to Notepad or some other text editor.
5. Find the line of code that says “encrypted” and copy the long string of hash characters that is quoted in the value parameter.
6. Log in to your Joomla account and create a new article.
7. Type the following tag into the article editor. Replace the example hash with the parameter number retrieved in step 5.
{nicepaypal:hosted-cart_view|-----BEGIN PxCx9-----vcNAQcEoIIGzjCCBsoCAQExggEwMIIBLAI...............n5ceE3RAW/DYsdw78QH+-----END PxCx9-----}
8. Save your article and your all done.